ADVERTISEMENT
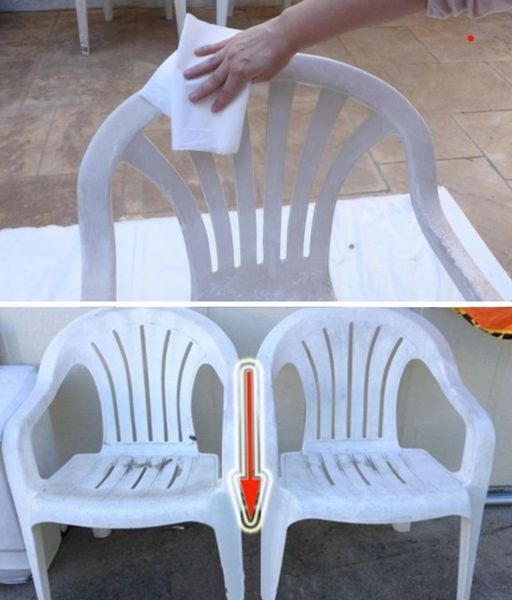
**Plastic Chairs Impossible to See? Here’s How to Whiten Them Perfectly!**
Plastic chairs are a staple in many households, patios, and outdoor spaces due to their affordability, durability, and ease of maintenance. However, over time, plastic furniture can lose its bright, clean appearance and begin to look dull, yellowed, or stained. Whether it’s from sun exposure, dirt, or just years of use, it’s common to wonder how to restore them to their former, pristine condition. If you’re struggling with plastic chairs that seem impossible to clean, don’t worry—I’m here to reveal all the tips and tricks for whitening them perfectly!
With the right approach and some simple household items, you can bring your plastic chairs back to life and have them looking fresh and clean in no time.
### Why Do Plastic Chairs Turn Yellow?
Plastic furniture, especially white or light-colored plastic, is prone to yellowing over time due to several factors:
1. **Sun Exposure**: UV rays from the sun can break down the chemical bonds in the plastic, causing it to discolor.
2. **Dirt and Grime**: Everyday use can cause dirt, oil, and other substances to accumulate on plastic, leaving behind stubborn stains.
3. **Environmental Factors**: Exposure to moisture, mold, and mildew can also contribute to yellowing and discoloration.
Luckily, these yellowed chairs are not beyond help. With the right methods, you can easily restore their bright, clean look.
### Step-by-Step Guide to Whitening Your Plastic Chairs
#### 1. **Start with a Good Cleaning**
Before diving into whitening techniques, it’s essential to give your plastic chairs a thorough cleaning to remove dirt, dust, and grime.
**Materials Needed:**
– Mild dish soap
– Warm water
– Soft cloth or sponge
– Baking soda (optional)
**How to Clean:**
– Mix warm water with a few drops of mild dish soap.
– Dip a soft cloth or sponge into the soapy water and gently scrub the entire surface of the chair, focusing on areas with visible dirt or stains.
– If the chair is particularly dirty or has stubborn stains, you can make a paste by mixing baking soda and water. Apply the paste to the stains and scrub with a sponge.
– Rinse with clean water and let the chairs dry completely before proceeding to whitening.
#### 2. **Whiten with Baking Soda and Vinegar**
Baking soda and vinegar are two powerful natural cleaning agents that work wonders when it comes to whitening plastic.
**Materials Needed:**
– Baking soda
– White vinegar
– Water
– Scrub brush or sponge
**How to Whiten:**
– Make a paste by mixing baking soda with a little water.
– Apply the paste directly to the yellowed areas of your plastic chairs.
– Let the paste sit for about 15-20 minutes, allowing the baking soda to work on breaking down the stains.
– After the waiting period, scrub the area gently with a brush or sponge.
– Spray or pour white vinegar over the paste to activate the fizzing reaction, which helps lift stains from the plastic.
– Use a clean cloth to wipe away the paste, and rinse the chair with water.
– Repeat the process if necessary.
#### 3. **Use Hydrogen Peroxide for Tough Stains**
Hydrogen peroxide is another effective and inexpensive solution for whitening plastic chairs. It’s a gentle bleaching agent that works well for stubborn yellow stains.
**Materials Needed:**
– 3% Hydrogen peroxide
– Spray bottle
– Soft cloth or sponge
**How to Whiten:**
– Fill a spray bottle with 3% hydrogen peroxide.
– Spray the peroxide generously onto the yellowed areas of the plastic chairs.
– Let it sit for about 30 minutes to an hour.
– After the waiting period, scrub the chair with a sponge or soft cloth.
– Rinse the chair thoroughly with water and let it dry.
– Repeat if necessary for heavily stained areas.
#### 4. **Use a Magic Eraser**
For a quick and easy solution, a Magic Eraser is a great tool to remove stains and yellowing from plastic chairs. These erasers are designed to lift dirt and stains without damaging the surface of the plastic.
**Materials Needed:**
For Complete Cooking STEPS Please Head On Over To Next Page Or Open button (>) and don’t forget to SHARE with your Facebook friends
ADVERTISEMENT
