ADVERTISEMENT
**Danish Butter Biscuits: A Delightful Treat for Any Occasion**
When it comes to classic, buttery, melt-in-your-mouth cookies, **Danish Butter Biscuits** are a beloved favorite. These crisp, golden biscuits are a staple of Danish baking tradition, known for their simple yet irresistible taste. Whether you’re enjoying a quiet afternoon with a cup of tea or looking to share something special with friends and family, these biscuits are the perfect treat to indulge in.
Made with just a few basic ingredients—flour, butter, sugar, and vanilla—these biscuits are delightfully easy to make and produce a rich, buttery flavor that will have you reaching for more. Whether you’re a seasoned baker or a beginner, this recipe offers a foolproof way to create these delicious cookies in the comfort of your own kitchen.
### Why You’ll Love Danish Butter Biscuits
1. **Buttery Perfection**: The standout feature of these biscuits is the generous amount of butter, which gives them their rich flavor and melt-in-your-mouth texture.
2. **Crisp and Light**: These biscuits are not overly sweet but are crisp and light, making them the perfect complement to a hot cup of coffee, tea, or milk.
3. **Simple Ingredients**: With only a few pantry staples required, Danish Butter Biscuits are incredibly easy to whip up, making them an ideal treat for any occasion.
4. **Versatile**: While delicious on their own, these biscuits can also be decorated with sprinkles, chocolate drizzles, or a dusting of powdered sugar to elevate them for special occasions.
5. **Perfect for Gifting**: Whether in a tin, box, or as part of a gift basket, these biscuits make a wonderful homemade gift for holidays, birthdays, or just to show someone you care.
### Ingredients You’ll Need
To make Danish Butter Biscuits, gather the following ingredients:
– **Butter**: The key to their rich flavor and texture. Use unsalted butter for the best results.
– **Flour**: All-purpose flour works perfectly for this recipe.
– **Sugar**: Granulated sugar adds sweetness and helps the biscuits achieve their delicate texture.
– **Vanilla Extract**: A splash of vanilla enhances the overall flavor and adds a lovely aroma.
– **Cornstarch**: This ingredient is used to give the biscuits a light, delicate texture and crisp finish.
– **Salt**: Just a pinch of salt helps balance the sweetness and enhance the buttery flavor.
– **Egg Yolk**: Helps bind the dough and gives the biscuits a richer color.
### How to Make Danish Butter Biscuits
**Step 1: Prepare the Dough**
Start by preheating your oven to 350°F (175°C). Line a baking sheet with parchment paper to ensure the biscuits don’t stick.
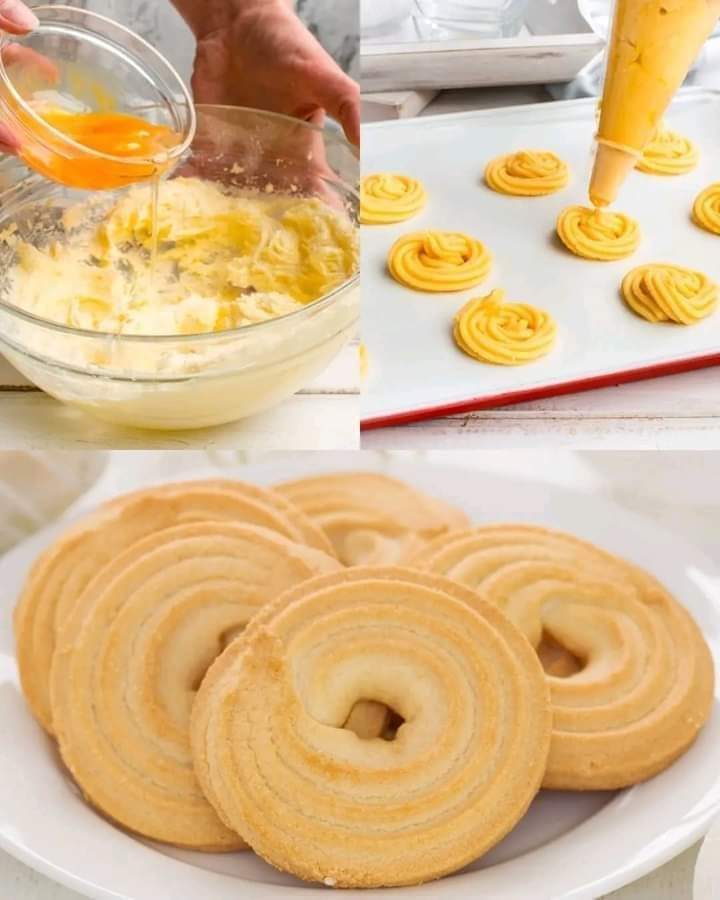
In a large mixing bowl, cream together the **unsalted butter** and **sugar**. Using an electric mixer or a wooden spoon, beat until the mixture is light and fluffy. This process will take about 3-4 minutes and helps create a soft, tender texture for the biscuits.
Once the butter and sugar are well-creamed, add the **egg yolk** and **vanilla extract** to the bowl. Mix until fully incorporated.
In a separate bowl, combine the **flour**, **cornstarch**, and **salt**. Gradually add the dry ingredients to the wet mixture, mixing until the dough begins to come together. Be careful not to overwork the dough to keep the biscuits tender.
**Step 2: Shape the Biscuits**
Now that the dough is ready, you can begin shaping your biscuits. Roll the dough into small balls, about 1 tablespoon in size. Place them onto the prepared baking sheet, spacing them about 2 inches apart to allow for slight spreading during baking.
To give the biscuits their signature shape, you can flatten the tops of the dough balls gently with the back of a fork, creating a crisscross pattern or simple indentations.
Alternatively, if you prefer a more traditional look, you can pipe the dough into rounds or shapes using a piping bag fitted with a star nozzle for a decorative effect.
**Step 3: Bake the Biscuits**
Place the tray in the preheated oven and bake for about 12-15 minutes, or until the biscuits are golden brown around the edges. Keep an eye on them towards the end to ensure they don’t overbake—these biscuits are meant to be light, crisp, and slightly golden, not too dark.
**Step 4: Cool and Serve**
Once the biscuits are done baking, remove them from the oven and let them cool on the baking sheet for a few minutes before transferring them to a wire rack to cool completely. This ensures they maintain their delicate crispness.
For Complete Cooking STEPS Please Head On Over To Next Page Or Open button (>) and don’t forget to SHARE with your Facebook friends
ADVERTISEMENT
