ADVERTISEMENT
—
## 🛒 What You’ll Need
– **Garlic bulbs** (choose organic, non-sprayed garlic from a nursery or farmer’s market)
– **Large pots** (at least 8–10 inches deep, with drainage holes)
– **Well-draining soil** (a mix of potting soil, compost, and a little sand for drainage)
– **Fertilizer** (organic, like compost or fish emulsion)
– **Watering can or spray bottle**
—
## 🧑🌾 Step-by-Step Guide to Growing Garlic in Pots
### Step 1: **Prepare Your Pot**
Choose a container that’s at least 8–10 inches deep, as garlic bulbs need plenty of room for their roots. Ensure it has drainage holes to avoid waterlogging. If your pot is too small, the garlic won’t develop properly.
Fill the pot with a **well-draining potting mix**. You can mix in some compost to enrich the soil, but avoid heavy garden soil, as it can retain too much moisture.
### Step 2: **Choose and Plant Garlic Cloves**
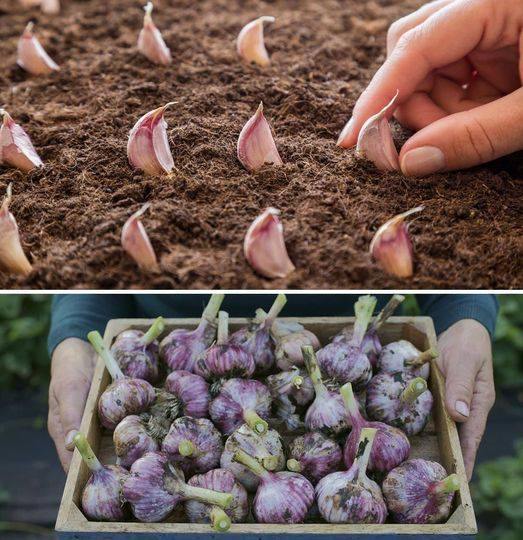
Select healthy garlic bulbs and separate them into individual **cloves**. Each clove will become one garlic bulb. Avoid using supermarket garlic, as it may not sprout properly.
– **Plant cloves** with the pointed end facing up and the flat end facing down.
– Space the cloves about **4 inches apart** and plant them about **2 inches deep** in the soil.
– If you’re planting multiple cloves, make sure the pot is large enough to allow for proper spacing and growth.
### Step 3: **Watering and Care**
Water the garlic after planting, ensuring the soil is moist but not waterlogged. **Garlic prefers consistent moisture**, but you don’t want it sitting in soggy soil.
– **Water regularly**, but let the soil dry out between waterings.
– Garlic doesn’t need much fertilizer, but you can feed it with a **balanced organic fertilizer** every 4–6 weeks during the growing season.
– **Keep your garlic in a sunny spot**. Garlic needs about **6–8 hours of sunlight** per day for optimal growth.
### Step 4: **Managing Growth**
– **Avoid heavy mulching**, as garlic likes to stay cool and dry.
– If you’re growing **hardneck garlic**, you’ll notice **flowering scapes** (curly stalks). You can trim these off to help the garlic put more energy into the bulb.
### Step 5: **Harvesting Your Garlic**
Garlic takes **8–9 months** to mature, so patience is key. You’ll know it’s time to harvest when the leaves start turning yellow and die back, usually in late summer or early fall.
– Gently pull the garlic bulbs from the soil when the leaves are half-dry.
– Let the bulbs **cure** in a dry, cool place for about 2–3 weeks to improve their storage life.
—
## 🏡 Year-Round Garlic Supply
With a little planning, you can stagger your garlic plantings to ensure a **year-round supply**:
– **Fall planting**: Plant garlic in late fall for a summer harvest.
– **Spring planting**: In warmer climates, plant in early spring for a late fall harvest.
—
## 🌟 Tips for Success
– **Choose the right variety**: Softneck garlic does best in warm climates, while hardneck garlic thrives in cold conditions.
– **Use organic garlic**: Commercial garlic may be treated with chemicals that prevent sprouting.
– **Be patient**: Garlic takes several months to mature, but it’s worth the wait.
—
## 🧄 Final Thoughts
Growing garlic in pots is a simple and rewarding way to enjoy a fresh supply of one of nature’s healthiest and most flavorful ingredients. Whether you’re a novice gardener or an experienced green thumb, you’ll find that garlic is one of the easiest plants to grow — and it will reward you with a bountiful harvest.
With just a few containers, a little care, and some patience, you can enjoy **homegrown garlic** all year long, and never run out of this kitchen staple again!
—
Would you like a guide on **how to store your harvested garlic** for maximum freshness or additional tips for growing other herbs in containers?
ADVERTISEMENT
