ADVERTISEMENT
### **Step-by-Step Guide to Cleaning Your Refrigerator Drain**
#### 1. **Unplug the Fridge and Empty It**
Safety first! Always unplug your refrigerator before doing any cleaning or maintenance. Then, remove any food or items that could be in the way while you’re cleaning.
#### 2. **Locate the Drain**
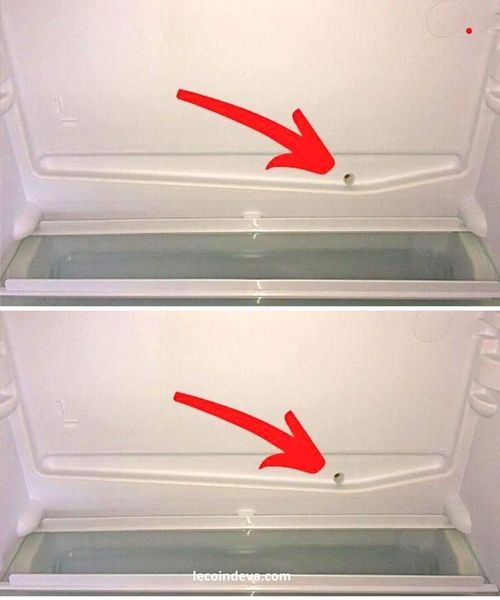
The refrigerator drain is typically located at the back of the fridge, near the bottom. It’s usually a small hole or a narrow tube that carries the water from the fridge to the drain pan under the appliance. In some models, the drain hole might be hidden beneath the crisper drawers or near the rear wall. Check your user manual if you’re unsure where the drain is located.
#### 3. **Clear Out Any Debris**
Once you’ve located the drain, use a small brush or pipe cleaner to clear away any visible debris from the hole or tube. Food particles, dust, and gunk can easily block the drain, so gently clear these out to allow the water to flow freely.
#### 4. **Flush the Drain with Warm Water**
Next, you’ll want to flush the drain with warm water to ensure it’s free of any stubborn blockages. You can use a turkey baster, pipette, or a squeeze bottle filled with warm water to slowly pour water down the drain. If your fridge’s drain is clogged, the warm water should help loosen any debris that may be stuck inside.
If you suspect that mold or mildew is causing the clog, you can use a mixture of water and vinegar (1 part vinegar to 1 part water) instead of just plain water to help disinfect and break down any buildup.
#### 5. **Check the Drain Tube**
Some refrigerators have a drain tube that leads down to a pan underneath the appliance. If your fridge has this feature, you may want to inspect the tube to make sure it’s not clogged. If it is, carefully remove any buildup with the same brush or pipe cleaner. You can even flush the tube with a bit more warm water to ensure it’s clean.
#### 6. **Dry and Wipe Down the Area**
Once you’re sure the drain is clear, use a towel or cloth to wipe up any excess water around the drain area and inside the fridge. This will help prevent any residual moisture from causing mold or mildew to grow. You can also leave the fridge door open for a while to let the area dry out completely.
#### 7. **Reassemble the Fridge and Plug It Back In**
Once you’ve finished cleaning the drain and drying the area, replace any drawers or shelves that were removed and plug the fridge back in. Allow the fridge to return to its normal temperature before putting the food back inside.
### **Tips for Preventing Future Drain Clogs**
While cleaning your fridge drain is easy to do, prevention is always better than dealing with a clogged drain. Here are some tips to help keep your fridge drain running smoothly and prevent future leaks:
– **Regular Maintenance**: Make it a habit to clean your fridge drain every 3-6 months to keep it clear of debris.
– **Keep the Interior Clean**: Wipe up any spills in the fridge promptly to avoid food particles clogging the drain.
– **Check the Door Seals**: Make sure the door seals are working properly to avoid excess moisture inside the fridge. This can contribute to the freezing and defrosting cycle, leading to more water that needs to be drained.
– **Use a Drain Tray**: If your fridge has a drain tray, make sure it’s positioned correctly so the water is channeled into the right place.
### **Conclusion**
Cleaning your refrigerator drain may not be the most glamorous chore, but it’s a simple and effective way to prevent water from leaking everywhere and causing potential damage. By regularly checking and maintaining the drain, you’ll not only keep your fridge working efficiently, but you’ll also avoid any unexpected leaks or unpleasant odors. Plus, with just a few simple steps, your fridge will be as good as new!
So, the next time you notice a puddle at the bottom of your fridge, you’ll know exactly how to tackle the problem and keep your fridge in tip-top shape. Happy cleaning!
—
I hope this article helps you get your refrigerator in perfect working order! Let me know if you need any adjustments or additional tips.
ADVERTISEMENT
