ADVERTISEMENT
—
### **Instructions**
#### **Step 1: Preheat the Oven and Prepare the Mold**
1. Preheat your oven to 400°F (200°C). Lightly grease the skull-shaped mold with a bit of olive oil to ensure the pizzas don’t stick during baking.
#### **Step 2: Roll Out the Pizza Dough**
1. Roll out the pizza dough on a lightly floured surface to about 1/4-inch thickness. You’ll need enough dough to cover the skull mold, so be sure to stretch it to fit.
#### **Step 3: Assemble the Pizza Skulls**
1. Carefully press the rolled-out dough into the skull-shaped mold, ensuring that the dough fits the shape of the skulls. You might need to trim the dough to fit the mold properly.
2. Spoon a tablespoon or two of pizza sauce into each skull mold cavity, spreading it out evenly.
3. Sprinkle a generous amount of shredded mozzarella cheese over the sauce.
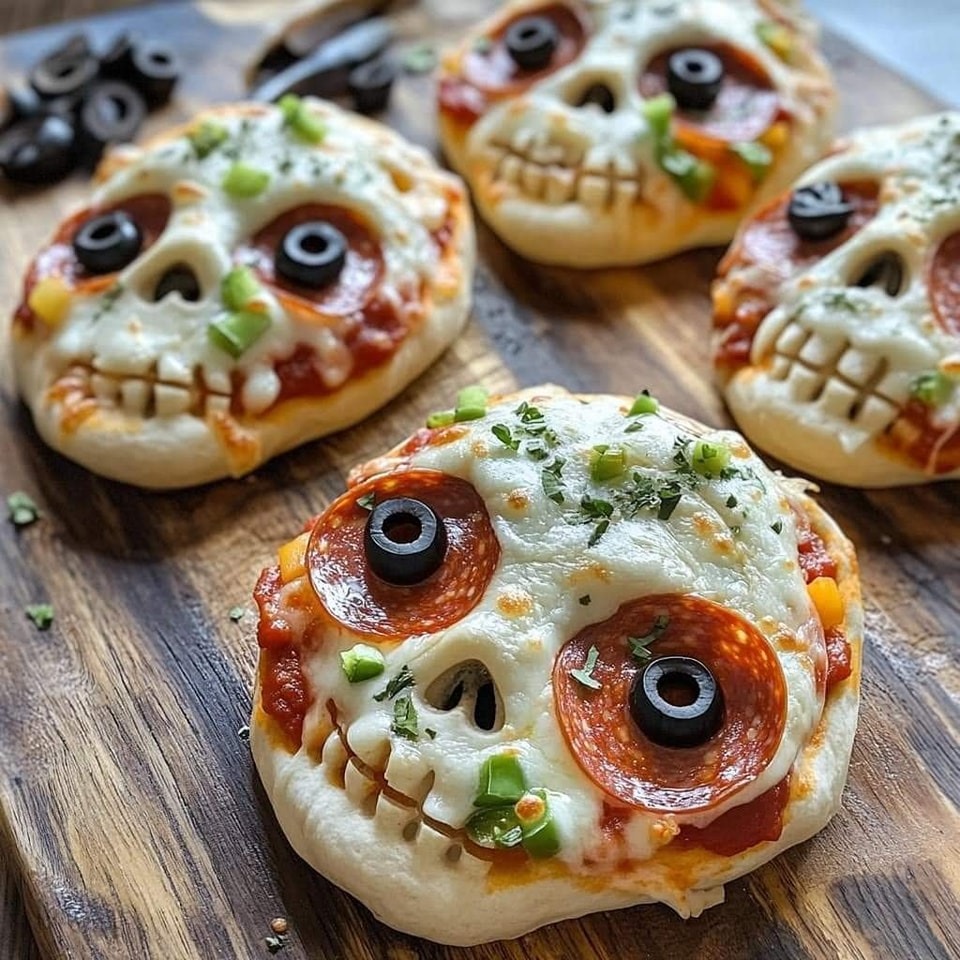
4. Add your desired toppings, such as pepperoni slices or vegetables like bell peppers, mushrooms, or olives. If using olives for the eyes, place them in the center of the pizza dough where the eyes would go.
#### **Step 4: Seal the Pizza Skulls**
1. Once each skull is filled, cut a small piece of dough for the “skull cap” or top layer. Place the cap over the filled pizza mold and press the edges down gently to seal the pizza skulls. This will ensure the pizza stays in shape while baking.
2. Brush the tops of the skulls with a bit of olive oil to help them brown and crisp up in the oven.
#### **Step 5: Bake the Pizza Skulls**
1. Bake the pizza skulls in the preheated oven for 12-15 minutes, or until the dough is golden brown and the cheese is melted and bubbling.
2. Carefully remove the skull pizzas from the mold once they’re done baking, and let them cool slightly before serving.
#### **Step 6: Serve and Enjoy**
1. Place the Halloween Pizza Skulls on a serving platter. If desired, you can use a small knife or edible markers to add more spooky details, such as “cracks” in the skulls or a mouth to make them even creepier.
2. Serve these pizza skulls as a fun Halloween treat to be enjoyed with friends, family, or party guests!
—
### **Why Halloween Pizza Skulls Are Perfect for Your Celebration**
1. **Fun and Interactive**: Pizza skulls are not only a delicious snack but also a fun, hands-on treat. Kids and adults can help assemble their own skulls or make them together as a group activity.
2. **Customizable for All**: Whether you prefer vegetarian toppings, meat lovers pizza, or something extra cheesy, Halloween Pizza Skulls can be customized to fit everyone’s tastes.
3. **Spooky Presentation**: The unique skull shape adds an extra layer of spooky fun to your Halloween celebration. It’s a sure way to impress your guests and create some great photo opportunities!
4. **Portable**: These skulls are easy to hold and eat, making them perfect for serving at Halloween parties or handing out to trick-or-treaters.
—
### **Tips and Variations**
– **Make Ahead**: You can prepare the pizza skulls in advance by assembling them, covering them with plastic wrap, and refrigerating them until ready to bake. Just be sure to bake them before serving.
– **Vegan or Gluten-Free Options**: For a vegan version, use dairy-free cheese and plant-based toppings. For gluten-free, you can substitute gluten-free pizza dough and follow the same steps.
– **Fillings Galore**: The possibilities are endless when it comes to toppings. Try adding cooked sausage, bacon, peppers, mushrooms, or any favorite pizza toppings. You can even experiment with different cheeses like cheddar, provolone, or parmesan for a fun twist on the flavor.
– **Decorate for Extra Scares**: After baking, use more olives or peppers to create gory effects like bloodshot eyes, cracks, or other creepy facial details on your skull pizzas. You can also serve with a side of marinara sauce for “bloody” dipping fun!
—
### **Conclusion**
Halloween Pizza Skulls are a fun, delicious, and spooky way to celebrate the season. Easy to make and highly customizable, these skull-shaped pizzas are perfect for parties, family nights, or as a fun way to get kids involved in the kitchen. With just a few simple ingredients and a bit of creativity, you can create a memorable Halloween treat that’s sure to impress your guests and satisfy hungry appetites. Give this recipe a try, and you’ll be the hero of your next Halloween bash!
ADVERTISEMENT
