ADVERTISEMENT
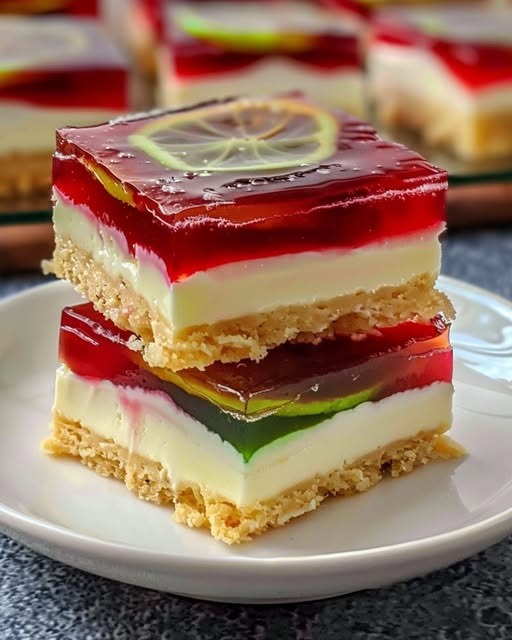
### Festive Jelly Slice: A Bright and Colorful Dessert for Any Celebration
The holiday season is a time for family, friends, and delicious food, and if you’re looking for a fun, festive dessert to brighten up your celebrations, look no further than the **Festive Jelly Slice**. This vibrant, layered dessert is not only a treat for the eyes but also a refreshing and tasty way to wrap up any festive meal. Whether you’re preparing for Christmas, New Year’s Eve, or just a special gathering, this easy-to-make dessert will be a hit with guests of all ages.
With its striking colors and sweet, creamy layers, the **Festive Jelly Slice** is sure to become a favorite in your dessert rotation. In this article, we’ll guide you through how to make this colorful treat and give you some tips on customizing it to your liking.
### What Makes Festive Jelly Slice So Special?
The beauty of the **Festive Jelly Slice** lies in its versatility. It’s a no-bake, easy-to-prepare dessert with vibrant layers of jelly, cream, and biscuits, making it both visually appealing and delicious. Here’s why it makes a perfect addition to any celebration:
– **Colorful Layers**: The bright, jewel-toned jelly layers bring a pop of color to your dessert table, adding a festive touch to any gathering.
– **Light and Refreshing**: Unlike heavy cakes and puddings, this dessert is light, cool, and refreshing, making it perfect for any occasion—especially those that take place in warmer weather.
– **Customizable**: The base jelly flavor can be changed to suit your preferences, and you can adjust the cream layers for a different texture or taste.
– **Easy to Make**: Despite its stunning appearance, the Festive Jelly Slice requires minimal effort and uses simple ingredients you likely already have at home.
### Ingredients for the Festive Jelly Slice
To make a beautiful and delicious **Festive Jelly Slice**, you’ll need the following ingredients:
#### For the Base:
– **250g (about 9 oz) of digestive biscuits** or Graham crackers, crushed into fine crumbs
– **100g (3.5 oz) of melted butter**
– **2 tablespoons of sugar** (optional, depending on the sweetness of your biscuits)
#### For the Jelly Layers:
– **3 different colored jelly packets** (choose vibrant colors like red, green, and yellow or mix and match your favorites)
– **Water** (for preparing the jelly)
– **1 can of sweetened condensed milk** (for the creamy layer)
– **250g (about 1 cup) of cream cheese**, softened
– **1 cup of whipped cream** (or heavy cream, for whipping)
– **1 tablespoon of gelatin** (to set the cream layer)
#### Garnish (optional):
– **Fresh berries** (such as raspberries, strawberries, or blueberries)
– **Whipped cream** for decoration
– **Mint leaves** for a touch of green
### How to Make the Festive Jelly Slice
#### Step 1: Prepare the Biscuit Base
1. Start by crushing your digestive biscuits or Graham crackers into fine crumbs. You can do this by placing them in a ziplock bag and smashing them with a rolling pin, or by pulsing them in a food processor.
2. Combine the biscuit crumbs with the melted butter and sugar (if using). Stir until the mixture is evenly coated and resembles wet sand.
3. Press the crumb mixture into the base of a lined baking dish or square pan, creating an even layer. Use the back of a spoon to compact it.
4. Refrigerate the base for about 15-20 minutes to allow it to firm up before adding the jelly layers.
#### Step 2: Make the Jelly Layers
1. **Prepare each jelly packet** according to the package instructions. Typically, this involves dissolving the jelly crystals in boiling water, then letting the mixture cool slightly before refrigerating it to set.
2. **Layering the Jelly**: For a beautiful, layered effect, you’ll need to pour the jelly into the dish in stages. Start with your first jelly flavor (for example, red) and pour it gently over the set biscuit base. Refrigerate for about 30 minutes to an hour, or until the jelly is firm but not fully set.
3. Once the first layer is firm, repeat the process with the second color (green, for example), and then refrigerate again to allow it to set. Follow the same steps with the third jelly color. By layering the jelly in stages, you’ll create a beautiful, striped effect in the finished slice.
4. After the jelly layers have fully set, move on to the next step.
For Complete Cooking STEPS Please Head On Over To Next Page Or Open button (>) and don’t forget to SHARE with your Facebook friends
ADVERTISEMENT
