ADVERTISEMENT
**How to Make Mosaic Jelly with 4 Ingredients: A Colorful and Fun Dessert**
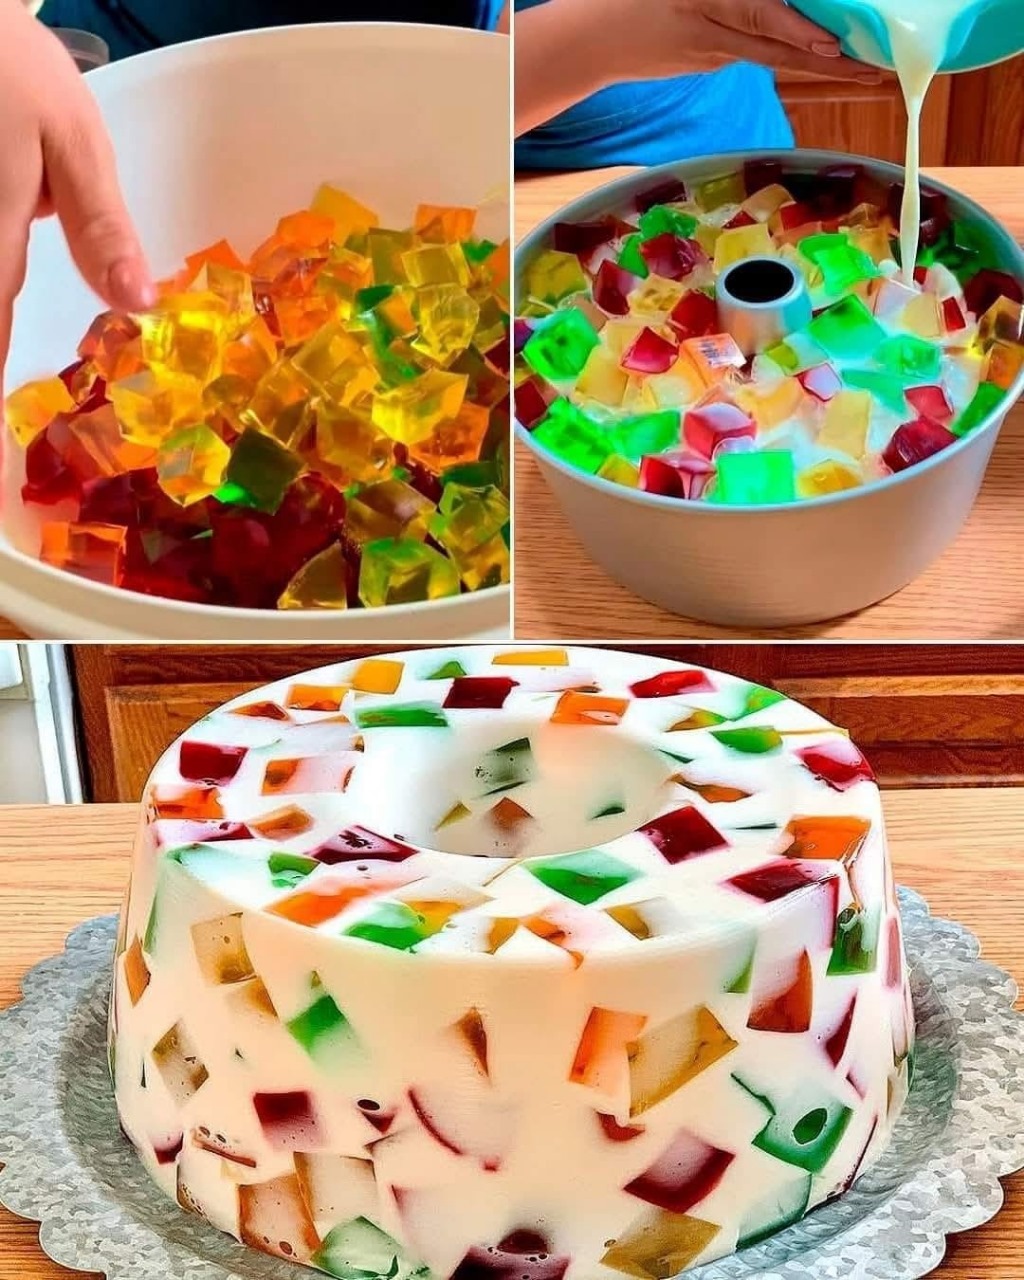
If you’re looking for a creative, colorful, and easy-to-make dessert that will impress guests of all ages, look no further than **Mosaic Jelly**! This simple, yet beautiful treat is made with just four ingredients and is sure to brighten up any occasion. The vibrant colors of the jelly layers create a stunning mosaic effect, making this dessert not only delicious but also visually striking. Whether it’s for a special event, a family gathering, or a fun treat for kids, mosaic jelly is the perfect choice.
Let’s dive into how you can make this delightful dessert with just four ingredients!
—
### **Why Mosaic Jelly Is So Special**
Mosaic jelly is an eye-catching dessert that combines the classic appeal of jelly (gelatin) with a playful and colorful twist. The layers of different colored jelly cubes are arranged together to create a “mosaic” effect, making it a fun and interactive dish. It’s a perfect balance of sweet, fruity flavors with a satisfying, gelatinous texture that everyone will enjoy. Plus, the simplicity of the recipe means you don’t have to spend hours in the kitchen.
This dessert is also incredibly versatile! You can use different flavors and colors of jelly to suit your personal preferences or match the theme of an event. It’s also a great way to get creative with presentation, making it as simple or elaborate as you want.
—
### **What You’ll Need to Make Mosaic Jelly**
The beauty of this dessert is in its simplicity. Here’s what you’ll need:
#### **Ingredients:**
1. **Jelly (Gelatin)**: You’ll need three different flavors of jelly to create the colorful mosaic effect. Choose your favorite flavors or go with a rainbow of colors to make the dessert even more vibrant. Raspberry, orange, and lime or lemon are great options for a nice variety of colors and tastes.
2. **Unflavored Gelatin**: This ingredient will be used to bind the colorful jelly cubes together and ensure the dessert holds its shape.
3. **Sweetened Condensed Milk**: This adds a creamy layer to the jelly, balancing out the sweetness and providing a smooth texture. It gives the dessert a beautiful contrast with the colorful jelly cubes.
4. **Water**: Used to dissolve the jelly and unflavored gelatin, water is an essential ingredient to bring everything together.
—
### **Step-by-Step Guide: How to Make Mosaic Jelly**
Making mosaic jelly is simple and fun! Here’s how you can prepare it in just a few steps:
#### **Step 1: Prepare the Colored Jelly**
Start by making the three different flavored jellies. Follow the instructions on the packet, usually mixing the jelly powder with hot water, and stirring until dissolved. Once dissolved, pour each jelly mixture into a separate shallow tray or dish. Allow the jelly to set in the fridge for about 4–5 hours or until it is firm.
#### **Step 2: Cut the Set Jelly into Cubes**
Once the colored jellies are fully set, take them out of the fridge. Use a knife to cut each flavor of jelly into small cubes—about 1/2 inch in size. The cubes will form the “mosaic” when they are layered together in the final dessert.
#### **Step 3: Prepare the Creamy Layer**
In a separate bowl, dissolve the unflavored gelatin in a little bit of cold water (follow the instructions on the packet). Once the gelatin is fully dissolved, mix it with the sweetened condensed milk. You may need to gently heat the mixture to fully dissolve the gelatin and achieve a smooth consistency. Stir until well combined, and let it cool slightly.
#### **Step 4: Combine the Jelly Cubes with the Creamy Mixture**
Carefully arrange the colored jelly cubes into a large, greased mold or a glass bowl. Once the cubes are layered in, pour the creamy condensed milk mixture over the top, ensuring it covers all of the jelly cubes. The creamy layer will bind the cubes together while adding a smooth and luscious texture.
**Step 5: Set the Mosaic Jelly**
Place the entire mold in the refrigerator and allow it to set for at least 3–4 hours, or until the jelly has firmed up completely. The result will be a colorful, creamy, and firm dessert that’s ready to be sliced and served!
For Complete Cooking STEPS Please Head On Over To Next Page Or Open button (>) and don’t forget to SHARE with your Facebook friends
ADVERTISEMENT
