ADVERTISEMENT
### Instructions
#### Step 1: Prepare Your Baking Pan
Start by lining an 8×8-inch baking dish with parchment paper or lightly greasing it with cooking spray. This will make it easier to remove the granola bars after they’ve cooled.
#### Step 2: Toast the Oats and Nuts (Optional but Recommended)
In a large skillet over medium heat, toast the oats and chopped nuts for 5-7 minutes, stirring frequently to avoid burning. This step brings out the natural flavors and gives your bars a richer, more toasty taste. Toasting is optional, but it can take the flavor to the next level. Once toasted, remove the mixture from the heat and let it cool slightly.
#### Step 3: Combine Wet Ingredients
In a small saucepan, heat the honey (or maple syrup), almond butter, and coconut oil over low heat until the mixture is smooth and fully melted. Stir in the vanilla extract, salt, and cinnamon (if using), then remove from the heat.
#### Step 4: Mix Dry Ingredients
In a large bowl, combine the toasted oats and nuts, dried fruit, seeds, and chia or flaxseeds (if using). Stir to distribute everything evenly. If you’re adding chocolate chips, set them aside for later so they don’t melt into the mixture.
#### Step 5: Combine Wet and Dry Ingredients
Pour the wet ingredients into the bowl with the dry ingredients and stir well to combine. The oats and nuts should be evenly coated with the almond butter and honey mixture. If the mixture feels too dry, add a splash of water or extra honey to help everything stick together. Once fully mixed, fold in the chocolate chips, if using.
#### Step 6: Press the Mixture into the Pan
Transfer the granola mixture into the prepared baking dish. Use a spatula or the back of a spoon to press the mixture down firmly and evenly into the pan. The more compact the mixture, the better the bars will hold together once cooled.
#### Step 7: Chill and Set
Place the baking dish in the refrigerator and let the mixture chill for at least 1-2 hours, or until it firms up completely. If you’re in a rush, you can also place it in the freezer for 30-40 minutes.
#### Step 8: Slice and Serve
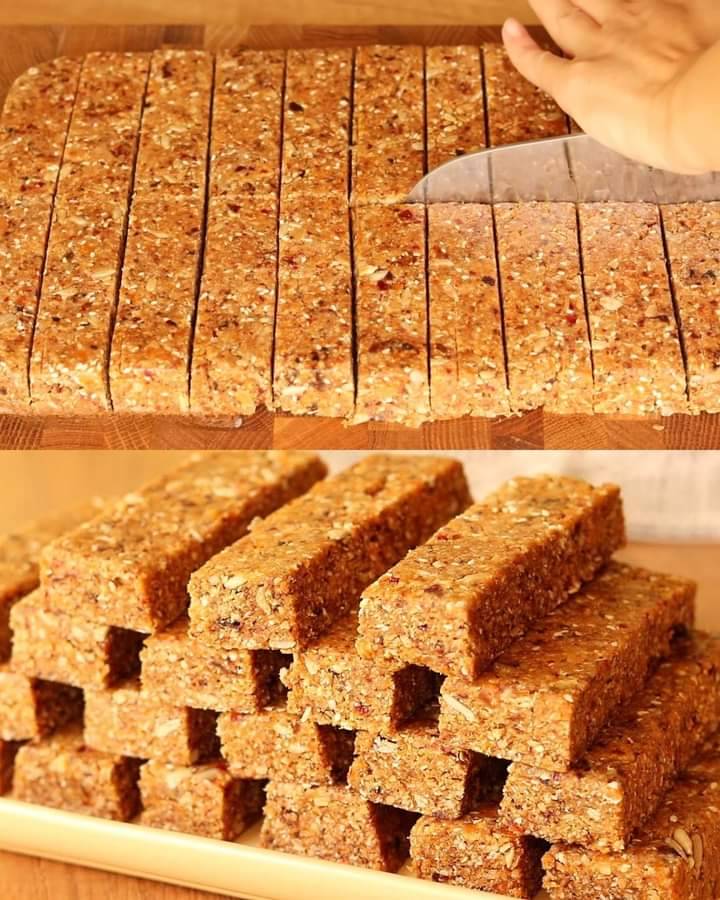
Once the granola mixture has set, remove it from the fridge and lift it out of the pan using the parchment paper. Place it on a cutting board and use a sharp knife to slice the mixture into bars or squares. Store the bars in an airtight container at room temperature for up to 1 week, or in the fridge for a longer shelf life.
### Tips for Customizing Your Granola Bars
1. **Nuts and Seeds**: Feel free to swap the nuts or seeds based on what you have on hand or your personal preferences. Pumpkin seeds, hazelnuts, or pecans all work wonderfully in this recipe.
2. **Sweeteners**: If you prefer a less sweet version, reduce the amount of honey or maple syrup. You can also use agave nectar or coconut sugar for a different flavor.
3. **Dried Fruit**: Use your favorite dried fruits, such as raisins, dates, or blueberries. Just be sure to chop them into smaller pieces to ensure an even distribution.
4. **Vegan-Friendly**: For a vegan version, make sure to use maple syrup (instead of honey), and choose a plant-based butter or nut butter. You can also skip the chocolate chips or opt for dairy-free chocolate.
5. **Protein Boost**: To make these granola bars even more filling, add a scoop of protein powder or hemp protein to the dry ingredients. This is a great option if you’re looking to refuel after a workout.
6. **Chocolate Lovers**: For a richer treat, drizzle some melted dark chocolate over the top of the bars before chilling. It adds a nice touch and elevates the flavor without overpowering the bar.
### Why You’ll Love These Fruit and Nut Granola Bars
– **Healthy & Wholesome**: Packed with oats, nuts, seeds, and dried fruit, these bars are a nutrient-dense snack that provides a balanced combination of healthy fats, fiber, protein, and natural sugars.
– **Customizable**: You can tailor these bars to fit any dietary preference. Whether you’re vegan, gluten-free, or simply looking to avoid processed sugars, this recipe can be easily adjusted to meet your needs.
– **No-Bake & Easy to Make**: With minimal cooking required and simple ingredients, these granola bars are quick to whip up and don’t require any special equipment. Just mix, press, chill, and slice!
– **Great for On-the-Go**: These bars are perfect for busy mornings, road trips, or as an easy snack to pack in lunchboxes. They’re portable, filling, and mess-free—ideal for when you’re on the move.
– **Tastes Delicious**: With their perfect balance of sweet and salty, chewy and crunchy, these bars are incredibly tasty and satisfying. Plus, they have a homemade quality that beats store-bought alternatives any day.
### Conclusion
These *Homemade Fruit and Nut Granola Bars* are the ultimate snack: nutritious, customizable, and delicious. Whether you’re fueling up for a busy day ahead, enjoying an afternoon snack, or packing them for a road trip, these bars offer a healthy, satisfying option without any of the unnecessary additives or sugars found in many store-bought granola bars. So, grab your oats and your favorite mix-ins, and make a batch of these wholesome bars today—you’ll never go back to store-bought again!
ADVERTISEMENT
