ADVERTISEMENT
### Instructions: How to Make Grandma’s Walnut Snails
#### 1. **Prepare the Dough**
Start by making the dough, which is the foundation of these walnut snails. In a large mixing bowl, combine the **flour**, **sugar**, and **salt**. Add the chilled **butter** cubes and use your hands or a pastry cutter to cut the butter into the flour mixture until it resembles coarse crumbs. The key is to work quickly so the butter doesn’t soften too much—this will keep the dough flaky and tender.
Next, add the **egg**, **sour cream**, and **vanilla extract**, and mix until a dough forms. If the dough feels a bit too sticky, add a little more flour, one tablespoon at a time. Once it’s a smooth ball of dough, wrap it in plastic wrap and refrigerate for at least **30 minutes**. This will make the dough easier to handle and ensure the snails hold their shape when baked.
#### 2. **Make the Walnut Filling**
While the dough is chilling, it’s time to prepare the walnut filling. In a medium bowl, combine the **ground walnuts**, **sugar**, and **cinnamon** (if using). Stir in the **egg white** and mix until the filling is well-combined and sticky enough to hold together.
If you prefer a slightly richer filling, you can add a spoonful of **honey** or a bit of melted **butter** to enhance the flavor and texture.
#### 3. **Roll Out the Dough**
Once the dough has chilled, preheat your oven to **350°F (175°C)**. Take the dough out of the refrigerator and place it on a lightly floured surface. Roll it out into a **large rectangle** about 1/8-inch thick. The size doesn’t need to be exact—just large enough to work with, as the dough will be cut into strips.
#### 4. **Fill the Dough**
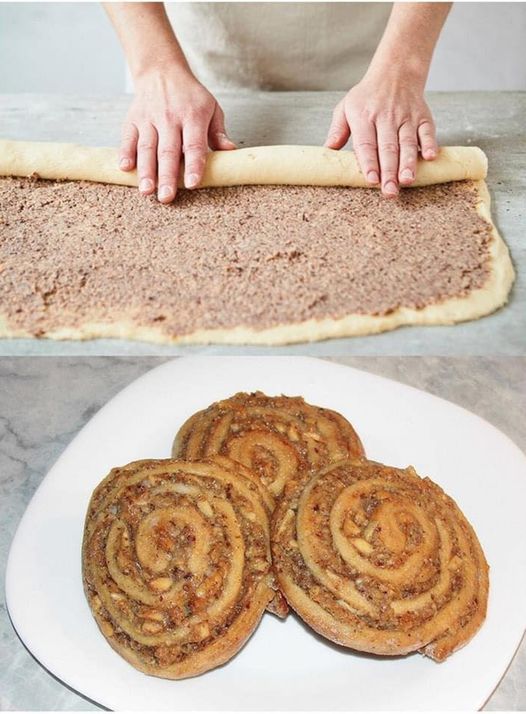
Spread the walnut filling evenly over the rolled-out dough, leaving about a **1-inch border** on all sides. Be generous with the filling—this is the star of the recipe! Once the filling is spread out, **carefully roll the dough up** into a tight log or cylinder, like you would for a jelly roll or cinnamon rolls.
Once the dough is rolled up, **cut the log into small slices**, about **1-inch wide**. These slices will form the “snail” shapes once they’re baked. Place the slices onto a baking sheet lined with parchment paper, spacing them about **1 inch apart**.
#### 5. **Bake the Walnut Snails**
Pop the walnut snails into the preheated oven and bake for **20-25 minutes**, or until they are golden brown and the dough has puffed up around the walnut filling. Keep an eye on them towards the end of baking to ensure they don’t burn, as oven times can vary.
#### 6. **Prepare the Syrup (Glaze)**
While the walnut snails are baking, make the syrup to glaze them. In a small saucepan, combine the **honey**, **water**, and **lemon juice**. Bring the mixture to a simmer over low heat, stirring occasionally until the syrup has thickened slightly. This should only take about **5-7 minutes**.
#### 7. **Glaze the Snails**
Once the walnut snails are baked and still warm, drizzle the syrup over the top of each one, allowing it to soak into the flaky pastry. The syrup adds a nice glossy finish and enhances the sweetness of the walnuts. For extra flavor, you can also brush the snails with a little melted **butter** before glazing them.
#### 8. **Serve and Enjoy**
Allow the walnut snails to cool slightly before serving, but they are best enjoyed **warm** or at room temperature. You’ll love the contrast of the crispy, buttery dough with the rich, sweet walnut filling. These walnut snails are perfect for any occasion and will undoubtedly become a cherished part of your baking repertoire.
### Tips for Perfect Walnut Snails
– **Toast the Walnuts**: For an extra layer of flavor, lightly toast the **walnuts** in a dry skillet before grinding them. This brings out their natural oils and gives the filling a deeper, nuttier flavor.
– **Adjust the Sweetness**: You can control how sweet the walnut snails are by adjusting the amount of sugar in the filling and syrup. If you prefer a less sweet version, reduce the sugar slightly.
– **Make Ahead**: You can prepare the dough and filling in advance, then store them in the fridge overnight. When you’re ready to bake, simply roll out the dough, fill it, and bake as directed.
– **Serving Suggestions**: These walnut snails are perfect with a cup of **coffee** or **tea** for breakfast or as an afternoon snack. They also make an excellent dessert to serve at family gatherings or parties.
### Why Grandma’s Walnut Snails Are So Special
There’s something magical about recipes that come from **Grandma’s kitchen**—they hold the essence of family traditions, memories of holidays and gatherings, and the comfort of home. Grandma’s walnut snails are no exception. The combination of **flaky dough**, **sweet walnut filling**, and a **glaze** that adds a beautiful shine is truly irresistible.
Whether you’re making these for a special occasion or just because, these walnut snails will quickly become a staple in your baking repertoire. They’re a perfect example of how the simplest ingredients can come together to create something truly extraordinary.
So roll up your sleeves, gather your ingredients, and get ready to bake the most delicious **walnut snails** that will have your family and friends begging for the recipe. After all, when it comes to Grandma’s walnut snails, there’s no such thing as “too many!”
ADVERTISEMENT
